If you're planning a home renovation, addition, or new construction project, understanding the residential architecture process can save you time, money, and frustration. As a licensed architect who has guided dozens of homeowners through this journey, I've learned that clarity about what happens when makes all the difference.
The architecture and construction process typically unfolds across ten distinct phases. While every project is unique, these phases provide a roadmap for transforming your vision into a finished home. The first half focuses on design, while the second half centers on construction—though the split isn't always perfectly even.
Let me walk you through each phase so you know exactly what to expect.
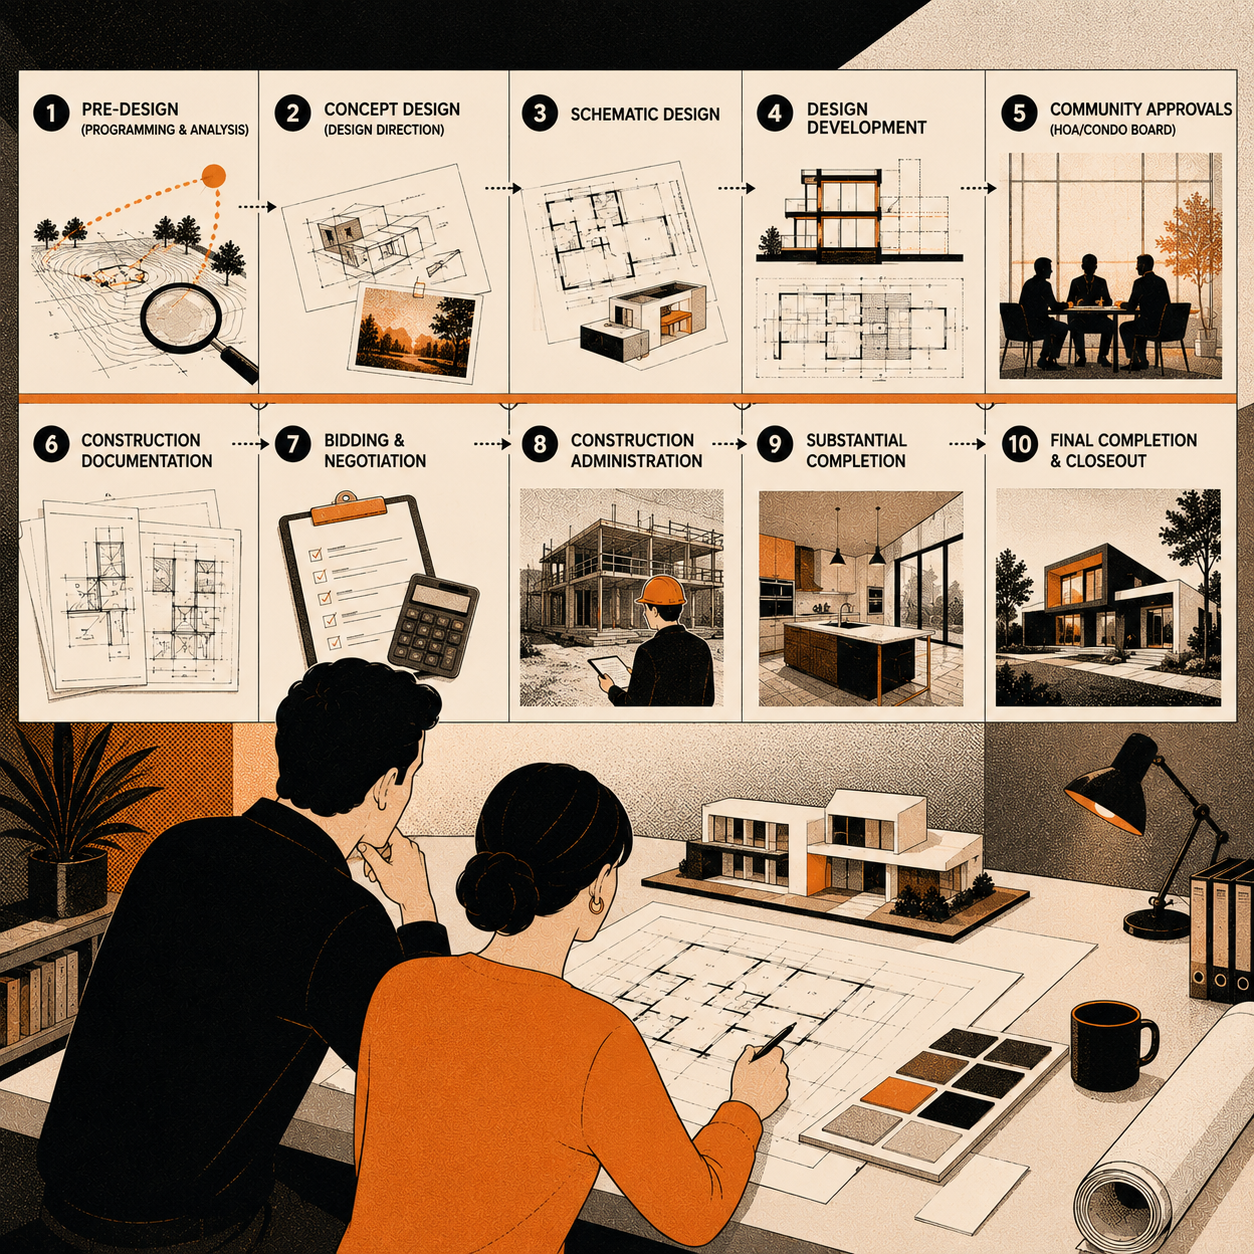
Phase 1: Pre-Design (Programming & Analysis)
Before any design work begins, I need to understand the full picture of your project. Pre-design is essentially an analytical phase where I gather all the information necessary to create a meaningful design solution.
What happens during pre-design:
The pre-design phase establishes the foundation for everything that follows. I'll work with you to define your project budget, construction timeline, and scope. For a home, this means determining how many bedrooms and bathrooms you need, how you want to use living spaces, and what outdoor areas matter most to you.
I also analyze your property itself—not just aesthetically, but legally. What can you actually build on your lot given zoning ordinances, setback requirements, and lot coverage restrictions? How does sunlight move across your site throughout the day? Where are the opportunities and constraints?
Most importantly, pre-design is when I dig into why you're doing this project and what you want to achieve. Without truthful, accurate information about your goals and constraints, I can't design something appropriate for your needs. Think of it like visiting a doctor—treatment requires diagnosis first.
Phase 2: Concept Design (Design Direction)
Concept design can feel elusive because it's the most abstract phase of the process. Some architecture practices skip this as a formal step and fold it into schematic design, but when it does exist, it serves an important purpose.
Finding the central idea:
Every successful project needs a spine—a central concept that holds all the smaller design decisions together. Sometimes that concept comes directly from you. Maybe you're obsessed with natural light, or you want the home to feel like a modern interpretation of a traditional farmhouse. Other times, the concept emerges from the site itself—a stunning view, a heritage tree, or the way the property slopes.
Concept design deliverables vary widely but typically include abstract sketches, diagrams, reference images, and written descriptions. The goal is to establish a design direction before diving into the specifics of floor plans and elevations.
Phase 3: Schematic Design
Schematic design is where your project starts to take recognizable shape. This is the phase most clients find exciting because abstract ideas become actual architectural drawings.
What schematic design delivers:
During schematic design, I translate the conceptual direction into scaled drawings that show the building's size, form, and spatial relationships. These drawings are still somewhat "cartoony"—they're not construction-ready, but they give you a clear sense of what the building will look like.
I typically present two to three design options during this exploratory phase. You might see different approaches to laying out your primary suite, or various ways to configure the relationship between your kitchen and outdoor spaces. This is the time to explore alternatives before committing to a direction.
By the end of schematic design, your design is roughly 25% complete. You should have a clear architectural outline—the big gestures and major decisions are made. Think of it like sketching the outline on a canvas before you start painting.
A word of caution: Once you move past schematic design, you really don't want to backtrack. Going backward at this point means restarting the design process, which costs time and money. Make sure you're confident in the direction before we move forward.
Phase 4: Design Development
Design development represents a major jump forward. If schematic design was an outline, design development is writing the full story with complete sentences, paragraphs, and chapters.
What gets developed:
During design development, I refine the schematic design into something much more realistic. You'll know the exact size of windows, the precise dimensions of doors, how many steps your staircase needs, and where every plumbing fixture will be located.
This is also when your project team expands. Structural engineers, mechanical engineers, and other consultants join the effort. Everyone contributes drawings that overlay on top of each other so I can coordinate how each building system works together—where ducts run in relation to structural beams, how plumbing lines route through framed walls, and so on.
Design development takes longer than schematic design because there's substantially more work involved. You'll have several meetings where I present refinements based on your feedback, but unlike schematic design, these aren't radically different options. You've chosen the path; now I'm refining the details within that direction.
The 90% milestone:
By the end of design development, your design is 85-90% complete. Your building essentially exists as a three-dimensional model—everything is there, all windows, doors, and architectural components are defined. The remaining 10-15% of design decisions happen during the next phase.
Phase 5: Community Approvals (HOA/Condo Board)
If your property is subject to a homeowners association, condo board, or similar community oversight, you'll need their approval before proceeding. This step doesn't apply to every project, but when it does, timing matters.
Why this happens before construction documents:
Community boards care about aesthetics—what your project will look like from the street and how it affects the neighborhood character. They're not reviewing life safety issues or building code compliance; they're making sure your design fits community standards.
Getting approval as soon as the design is developed enough (usually after design development) prevents wasting time and money. You don't want to complete all your construction documents only to discover the board requires changes to your exterior materials or roof design.
The process typically involves getting approval signatures from adjacent neighbors and making a presentation to the board. As your architect, I handle this presentation so you don't have to navigate the politics yourself.
Phase 6: Construction Documentation
Construction documentation (often abbreviated as "CDs") is the longest phase of the design process. This is when I create the detailed technical drawings and specifications that contractors use to build your home.
Why CDs take so long:
While design development defined what your building looks like, construction documents explain how every component goes together. I'm essentially creating a comprehensive instruction manual for construction. Every wall base detail, every ceiling condition, every window flashing assembly gets documented.
The construction document set includes architectural drawings, schedules (think of these as spreadsheets listing every door, window, light fixture, and finish), and specifications (detailed product information for materials and equipment). Your structural engineer, mechanical engineer, and other consultants also contribute their drawings to this coordinated set.
Your role during CDs:
You'll be less involved during construction documentation than in earlier phases. This is technical work—deciding what type of insulation to use, how to flash windows, which sheathing materials meet code requirements. These aren't decisions that require your input; they're problems I need to solve based on my expertise.
That said, the final 10-15% of design decisions do happen during CDs. Small details about reveals, material transitions, and custom millwork get finalized. But the heavy lifting happens behind the scenes.
Phase 7: Permitting (Agency Approvals)
Before any construction can begin, you need a building permit from your local building department. This is a legal requirement for virtually any substantial residential project.
What permitting involves:
Building codes exist to ensure life safety—that your home can withstand local climate conditions, that you can safely exit during a fire, that structural systems are sound. The building department reviews a permit drawing set (which is different from your full construction document set) to verify code compliance.
I prepare the permit drawings, sign and seal them as a licensed architect, and submit them to the building department. A plan checker reviews them and typically sends back comments or required corrections. Very few permit sets get approved on the first submission—expect at least one round of revisions.
Timeline reality:
Permit review timelines vary dramatically by municipality. Some towns turn around reviews in two weeks; others take months. This is completely outside anyone's control, and different plan checkers at the same department can have different interpretations of code requirements.
Sometimes I submit for a permit while simultaneously advancing the construction documents. If I'm confident the design won't change dramatically, this parallel approach saves time. There's some calculated risk, but it can accelerate your timeline significantly.
Phase 8: Contractor Selection (Bidding)
If you don't already have a contractor, you'll need to select one. The construction document set is what contractors use to provide accurate pricing for your project.
The bidding process:
I typically recommend two to five contractors who I trust to do quality work. I coordinate a site visit so they can walk through your property (if it's a renovation) and review the drawings in detail. They have a few weeks to develop their bids, ask questions, and submit pricing—everyone submits on the same date to keep the process fair.
Once bids come in, I review them line by line with you. Why is one contractor higher than another? What's included or excluded? Are there alternates that could save money without compromising design quality? I help you understand what you're actually getting for the price.
Beyond the lowest bid:
Price matters, but it's not everything. You need a contractor you trust, who communicates clearly, whose craftsmanship matches your expectations, and whose schedule aligns with your timeline. I help evaluate these factors because I've seen their work and know their capabilities.
For residential projects specifically, a contractor who specializes in custom homes will have different skills than one who does spec work or commercial projects. Make sure the contractor's experience matches your project type.
Phase 9: Construction & Construction Administration
Finally, you break ground. Construction is when your home transforms from drawings into physical reality. My role during this phase is construction administration (often abbreviated as "CA").
What construction administration includes:
I make regular site visits—typically weekly, though the frequency depends on the project phase and complexity. During these visits, I observe construction progress, verify that work matches the design intent shown in the drawings, and address any questions the contractor has.
Construction always uncovers surprises, especially in renovation projects. When something unexpected comes up—an existing condition that wasn't visible until demolition, a dimensional conflict between two building systems, a material that's suddenly unavailable—I problem-solve in real time.
I also review shop drawings, which are detailed fabrication drawings produced by manufacturers and subcontractors. These show exactly how custom cabinetry, millwork, structural steel, or other specialized components will be built. I review them to ensure they match the design intent before fabrication begins.
Why CA matters:
Having your architect involved during construction protects your investment. Contractors aren't designers—when changes need to be made, you need someone thinking about design implications, not just construction logistics. Without architectural oversight, well-meaning contractors and homeowners often make decisions that compromise the design in ways that can't be undone.
Phase 10: Punch List, Final Walkthrough & Staging
As construction nears completion, the building reaches what's called "substantial completion"—safe and occupiable, but not quite finished. This triggers the punch list process.
Creating the punch list:
I walk through the entire project with you and the contractor, making a detailed list of everything that needs correction, repair, or finishing. A dent in a door, missing paint on trim, a fixture that's not working correctly—everything gets documented. The contractor returns to address every item on the list.
Once punch list items are complete, there's a final walkthrough. If everything looks good, the project is officially closed out and you can move in.
Furnishing and staging:
While this is listed as the final phase, furniture selection typically happens during construction. I don't wait until you have keys in hand to start selecting sofas and dining tables—lead times on quality furniture can be substantial.
During construction administration, while I'm managing site visits and shop drawing reviews, I'm also sourcing and specifying furniture. The goal is to have everything arrive around the time construction finishes so you can move right in.
For larger projects, furniture often ships to a warehouse for storage and inspection, then gets delivered and staged once the contractor's work is complete. I'm on site during staging to direct placement and ensure everything works together as designed.
The Architecture Process: Key Takeaways
Understanding these ten phases helps you know what to expect, when to expect it, and what's required from you at each stage. A few important principles apply throughout:
Design is a process of refinement. You start with big decisions and broad gestures, then progressively refine details. Each phase builds on the previous one, which is why backtracking becomes increasingly expensive and time-consuming.
The phases exist for good reasons. This process has evolved over time to balance design quality, legal compliance, construction feasibility, and client involvement. Skipping phases or collapsing them together rarely leads to better outcomes.
Your involvement varies by phase. You're heavily involved during concept, schematic, and design development. Less so during construction documents and permitting. Very involved again during construction administration and furnishing. Understanding this rhythm prevents frustration when I'm working behind the scenes on technical details.
Changes get harder (and more expensive) as you progress. Changing the layout during schematic design is straightforward. Changing it during construction documentation requires redoing substantial work. Changing it during construction can be catastrophically expensive. Make thoughtful decisions early and stick with them.
The relationship matters. You'll be working with your architect and contractor for months or even years. Choose people you trust, communicate well with, and genuinely like. The process goes more smoothly when everyone involved respects each other and works collaboratively.
If you're considering a home renovation, addition, or new construction project in New Jersey or New York, understanding this process is the first step. The second step is finding an architect who can guide you through it with expertise, transparency, and genuine care for your goals.
That's exactly what I do at Tight House.